Use Power BI JavaScript SDK And Embed The Power BI Report In HTML Page - Power BI Embedded - Step By Step - Part Five

Overview
In this article, we will learn how we can embed our Power BI report in HTML Page using JavaScript SDK. I have attached the code to this article. You can directly download the HTML file.
Before we start I prefer you to read my earlier articles:
Now, let’s get started!

Step 1
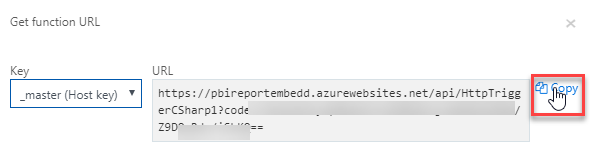
Copy the Azure App function URL.


Step 2
Create one HTML file and paste the following code snippet.
  1. <html>  
  2.   
  3. <head>  
  4.     <meta http-equiv="Content-type" content="text/html; charset=utf-8">  
  5.     <meta name="viewport" content="width=device-width,initial-scale=1">  
  6.     <title>Power BI Embedded Demo</title>  
  7.       
  8.     <script type="text/javascript" language="javascript" src="https://code.jquery.com/jquery-1.12.4.js"></script>  
  9.     <script type="text/javascript" language="javascript" src="https://rawgit.com/Microsoft/PowerBI-JavaScript/master/dist/powerbi.min.js"></script> </script>  
  10. </head>  
  11.   
  12. <body>  
  13.     <h1>Power BI Embedded Demo</h1>  
  14.     <div id="reportContainer" style="width: 80%; height: 800px;"></div>  
  15. </body>  
  16.   
  17. <script>  
  18.     $(document).ready(function () {  
  19.         var getEmbedToken = "ADD Your Copied URL";  
  20.   
  21.         $.ajax({  
  22.             url: getEmbedToken,  
  23.             jsonpCallback: 'callback',  
  24.             contentType: 'application/javascript',  
  25.             dataType: "jsonp",  
  26.             success: function (json) {  
  27.   
  28.                 var models = window['powerbi-client'].models;  
  29.   
  30.                 var embedConfiguration = {  
  31.                     type: 'report',  
  32.                     id: json.ReportId,  
  33.                     embedUrl: json.EmbedUrl,  
  34.                     tokenType: models.TokenType.Embed,  
  35.                     accessToken: json.EmbedToken  
  36.                 };  
  37.   
  38.                 var $reportContainer = $('#reportContainer');  
  39.                 var report = powerbi.embed($reportContainer.get(0), embedConfiguration);  
  40.   
  41.   
  42.             },  
  43.             error: function () {  
  44.                 alert("Error");  
  45.             }  
  46.         });  
  47.   
  48.     });  
  49. </script>  
  50.   
  51. </html>  
Step 3
Apply your Azure App function URL in the variable “getEmbedToken”.
Step 4
Run the code and check the result.

 
Conclusion
This is how we can embed our Power BI report in HTML Page. Hope you love this article! Stay connected with me.

Comments

Popular posts from this blog

How To Lock Objects In Power BI

Overview Sometimes, there is a situation where when we open a report and click on any visual it accidentally nudges a chart a little bit to the right or left. Sometimes, by mistake when viewing a report, the arrangement of visuals scatters a little bit. Microsoft rolls out one new amazing feature to resolve this issue, that is, Lock Objects in Power BI. Advantages of using this feature When our purpose is to only view a report, this feature is a boon for us. Visualization’s position is not changed. Saves a lot of the developer's time to resolve the position related issues. Note   -  This feature is not saved with the report. So, every time you open a report, you need to enable this feature. Now, let’s understand this feature in a brief manner. To understand this, I will first show you one report in which I have not enabled “Lock Objects” feature. Step 1 The below screenshot shows my report which doesn’t have the enabled Lock Objects feature. ...

How to partition or split DataTable in C#?

Today we will discuss how we can divide or split a very large data table into fixed size of chunks? Scenario: Suppose there is a data table which has 1000 Rows. When you perform for each loop on data table and read each row at that time it will take too much time. If we devide 1000 Rows datatable into 10 fixed sizes (e.g. 100 Rows) datatable, It will take less time. Let's check how to achieve it. Here is a code. private static List<DataTable> SplitTable(DataTable originalTable, int batchSize) { List<DataTable> tables = new List<DataTable>(); int i = 0; int j = 1; DataTable newDt = originalTable.Clone(); newDt.TableName = "Table_" + j; newDt.Clear(); foreach (DataRow row in originalTable.Rows) { DataRow newRow = newDt.NewRow(); newRow.ItemArray = row.ItemArray; newDt.Rows.Add(newRow); i++; if (i == batchSize) ...

Install Power BI PowerShell On Your Windows Machine

Overview : In this article, we will learn how we can easily install PowerShell for the Power BI on our machine. Installation of PowerShell for Power BI is very easy, and I have tested it. So, let’s get started! Notes before you start Check your current Windows PowerShell version using the following code snippet. $psversiontable   Make sure you have the latest version of PowerShell installed on your machine. I will recommend having PowerShell version 5.1 or more. If you have an older version, you are not able to install the PowerBI module. Update your .NET Framework with 4.7.2 or higher. Once we have the above two prerequisites, we are ready for the installation for the Power BI PowerShell. You can find Microsoft.PowerBI.PowerShell Module in the PowerShell Gallery. Here is a link for the same:   Click Here . You can also download it from Microsoft GIT repo:   Click here . Now, let’s start the process. Step 1 Open your Windows PowerShel...